Lesson 9: Use Your Gmail Account to Access Other Accounts

After all we’ve shown you about how useful Gmail can be, you may decide to check all your email accounts (Hotmail, Outlook, Yahoo Mail, etc.) in Gmail. Luckily, Gmail can act as an email client and allow you to get email from other email accounts as long as they support POP access.
SCHOOL NAVIGATION
- Getting to Know Gmail
- The Mobile App, Composing Mail, and Conversations
- Inbox Management and Labels
- Mail Filters and the Star System
- Attachments, Signatures, and Security
- Invitations and Vacation Responders
- Use Gmail as a Task List
- Multiple Accounts, Keyboard Shortcuts, and Remote Signout
- Use Your Gmail Account to Access Other Accounts
- Power Tips and Gmail Labs
Gmail’s Mail Fetcher feature downloads all your old emails from other email accounts as well as new emails and displays them alongside your Gmail messages in your inbox. You can add up to five other email accounts.
We’re also going to explain how you can use Gmail offline, because it’s possible that you might go somewhere without Internet at some point. Sure, you can use a third-party mail client like Apple Mail, Outlook, or Thunderbird, but if you prefer using a web browser, there’s an offline app for Google Chrome.
Set up Mail Fetcher to Receive Email from Other Accounts
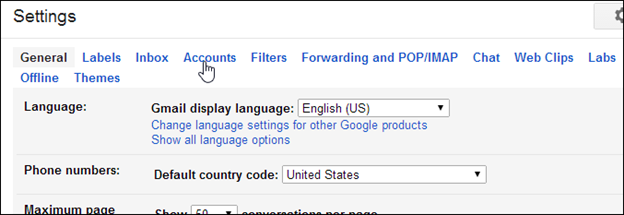
To set up Mail Fetcher to check email from another account, click the “Settings” gear button and select “Settings” from the drop-down menu. Click the “Accounts” link at the top of the “Settings” screen.
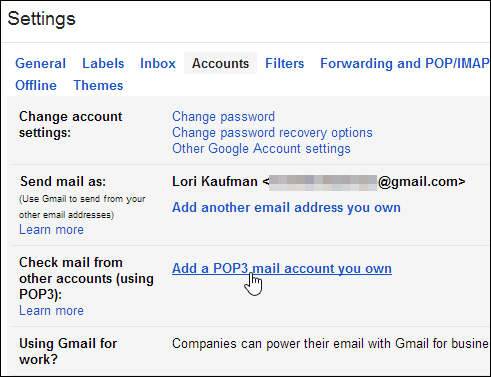
In the “Check mail from other accounts (using POP3)” section, click the “Add a POP3 mail account you own” link.
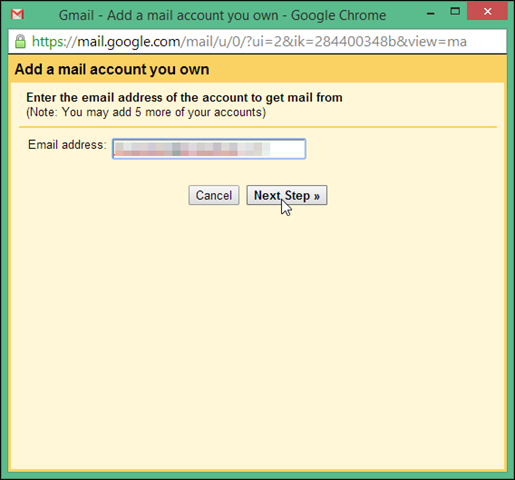
The “Add a mail account you own” dialog box displays. Enter the email address for which you want to receive emails in your Gmail account in the “Email address” edit box. Click “Next step.”
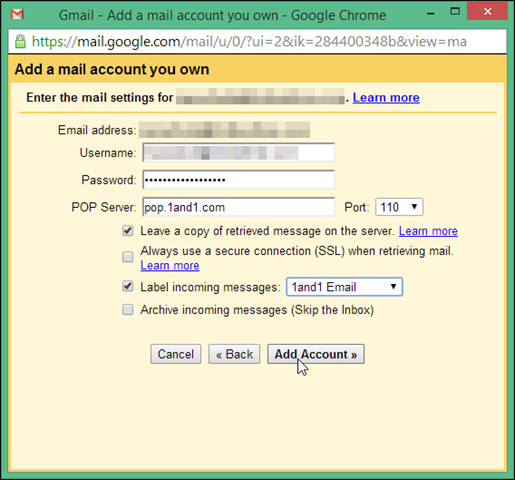
Enter the settings for your other email account, such as the “Username,” “Password,” “POP Server,” and the “Port.”
If you still want to be able to check email for your other account in other email clients on other computers, select the “Leave a copy of retrieved message on the server” check box.
You can also choose to label incoming messages for the other account with a special label, so you can tell which messages they are in your Gmail inbox. To do this, select the “Label incoming messages” check box and select a label from the drop-down list. There is an option in the list to create a new label if you don’t currently have one that is appropriate.
If you don’t want the messages from your other account in the inbox with your Gmail messages, you can select the “Archive incoming messages (Skip the inbox)” check box to bypass the inbox and archive the messages immediately.
NOTE: You can also set up a filter to move the messages to a label. See Lesson 4 more information.
Click “Add Account.”
Now, you have the choice of setting up Gmail to send mail as the other email address. To do this, select the “Yes, I want to be able to send mail as” option and click “Next Step.”

Enter information about your other email address. By default, the “Treat as an alias” check box is selected, however, you may want to turn it off.
When you use an alias, messages you send to a “Send mail as” address appear as unread in your inbox, as well as appearing in your “Sent Mail.” Also, when you receive an email from a “Send mail as” address and you click “Reply” in the message, the “To” field is populated with your primary Gmail address. To avoid these problems, uncheck the “Treat as an alias” box, then click “Next Step.”

If you’re going to send email as your other address, you must tell Gmail whether you want to use Gmail’s servers or the SMTP servers for your other provider. It’s easier to setup “Send mail as” using Gmail’s servers, so we recommend you do that. Select the “Send through Gmail” option and click “Next Step.”

Now you need to verify that you own the other email address you’re adding in Gmail. Click “Send Verification” to have Gmail send an email to your other address.

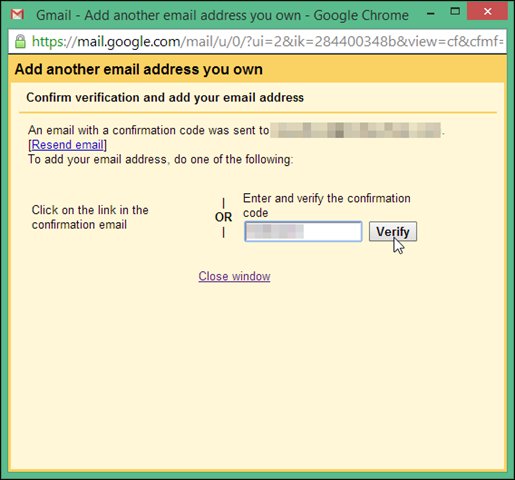
The confirmation email contains a link you can use to verify your address, or you can enter the confirmation code from the email in the “Enter and verify the confirmation code” edit box and click “Verify.”
The “Add another email address you own” dialog box will close automatically. If you click the link in the confirmation email, you may have to close the dialog box manually by clicking the “Close window” link.
Your other email address is added to the “Check mail from other accounts (using POP3)” section on the “Settings” screen. It’s also added to the “Send mail as” section, if you chose to be able to send mail from that address in Gmail. In the “Send mail as” section, under “When replying to a message,” you can choose to “Reply from the same address was sent to” or to “Always reply from the default address,” which is your current Gmail account. Note that you can always change the “From” address when you compose your new message or reply.

Email messages received for your other email account display in your inbox (unless you automatically archived them or moved them to a label) with whatever label you assigned to them.

Hide Folders and Labels in Gmail IMAP
The ability to access all your Gmail in almost any email program and on almost any device is handy. However, if you have a lot of email, you may not want to sync with everything, such as the All Mail folder that contains five gigabytes worth of email.
If you only want to access the messages in your Gmail inbox, and your email program does not allow you to unsubscribe IMAP folders, you can hide the folders, or labels, instead. This stops mail in those labels from downloading.
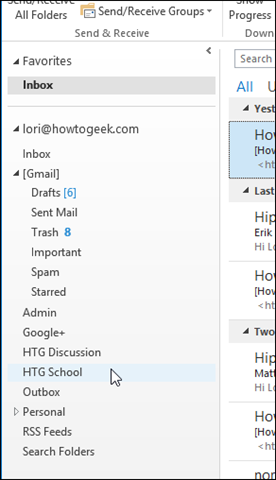
Microsoft Outlook is an example of a program into which you can download your Gmail using the IMAP protocol. We’ve previously shown you how to add your Gmail account to Outlook using IMAP.
To hide a Gmail label from IMAP access, click the “Settings” gear button and select “Settings” from the drop-down menu.

For any “System labels” and custom “Labels” with which you don’t want to sync in your email program, uncheck the box next to the “Show in IMAP” option.

The next time you open your email program or check your Gmail account in the program (sync with your account), the labels you hid will not be visible.
Make Syncing with Gmail Using IMAP Faster with Less Email Traffic
You can also make checking your email in another email program using IMAP faster by limiting the number of messages visible in each label (folder) in Gmail IMAP, so your email program will have less to download, cache, and keep in sync.
To limit the number of messages visible in each folder in Gmail IMAP, click the settings gear button and select “Settings” from the drop-down menu. Click the “Forwarding and POP/IMAP” link at the top of the “Settings” screen.

Scroll down to the “IMAP Access” section and select the “Limit IMAP folders to contain no more than this many messages” option. Select a number from the drop-down list and click “Save Changes.”

Send Messages from Another Email Account in Gmail
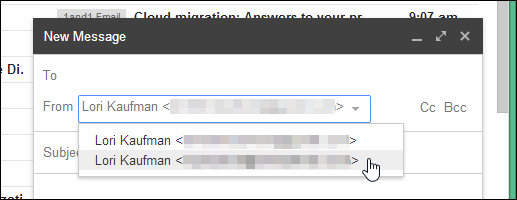
When sending a new email message or replying to an email message, you can change which email address from which you want the message sent. Select an address from the “From” drop-down list.
Disable Mail Fetcher for an Email Account
If you decide you don’t want to get email from your other email account in Gmail anymore, you can disable mail fetching for that account. To do this, click the “Settings” gear button and select “Settings” from the drop-down menu. Click the “Accounts” link at the top of the “Settings” screen. To the far right of the screen, in the “Check mail from other accounts (using POP3)” section, click the “delete” link.
You can also edit the information for the extra email address using the “edit info” link.
NOTE: Mail Fetcher will stop retrieving new messages from the other email account, but any email that you previously received will remain in Gmail until you delete it.

A confirmation dialog box displays to be sure you want to delete the email account, then click “OK.”
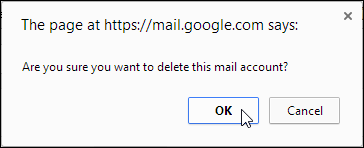
A message displays saying the email account was removed. However, the email account remains in the “Send mail as” section, if you chose to be able to send email from that account. You can leave it there if you still want to use Gmail to send mail from that address, even though you won’t be receiving email from that account. If you don’t want to send email from that account anymore, click the “delete” link to the right of that email account in the “Send mail as” section.
Again, a confirmation dialog box displays to make sure you want to delete this email account from “Send mail as.”

Google warns you about possibly receiving email from your other account after you remove it:
“Also, please note that previously fetched messages, especially if there were a large number, may still arrive even after you’ve disabled Mail Fetcher. If you continue to receive mail from your other account a few hours after disabling Mail Fetcher, your other account may be configured to automatically forward your mail. Please log into your other email account and check your automatic forwarding settings. If you’re not sure how to turn off automatic forwarding, ask your other webmail provider for further assistance.”
Another option for receiving email from another account in your Gmail account is to have email automatically forwarded to your Gmail address from that account. The method for setting up auto-forwarding will differ depending on your email account. Check with your email provider for details.
Work with Gmail Offline Using the Google Chrome App
When you want to use Gmail and you don’t have a network connection, you can still access your synchronized messages using the “Gmail Offline” Google Chrome app. When you’re online, your data synchronizes in the background, so when you don’t have a connection, you’ll have the information you need backed up.
NOTE: If you close Google Chrome while you’re online, your data will stop syncing at that time.
You can perform most common actions on your Gmail such as sending mail, archiving, labeling, and starring messages when you’re offline. These actions are simply pending, waiting for the next time an internet connection is available on that computer. When that computer is connected to the internet again, all pending actions will be updated on Gmail’s servers accordingly. Remember though, if you’re working offline on one computer and then you access Gmail online from a different computer, you won’t see the changes made offline on the other computer until that other computer is connected to the internet again.
Install the Gmail Offline App for Google Chrome
To install “Gmail Offline,” open Google Chrome, go to https://chrome.google.com/webstore/detail/gmail-offline/ejidjjhkpiempkbhmpbfngldlkglhimk, and click the blue “Free” button in the upper-right corner of the popup window.
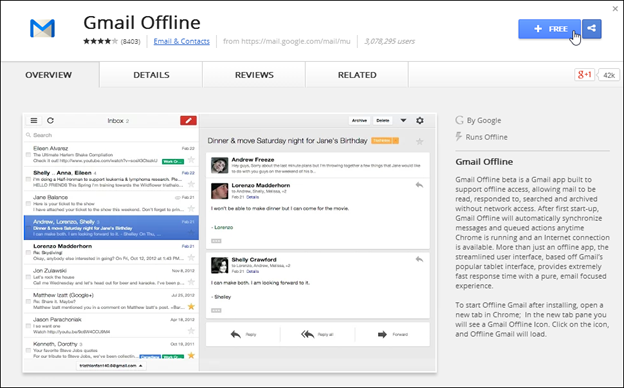
The “Confirm New App” dialog box displays. Click “Add” to continue installing the app.

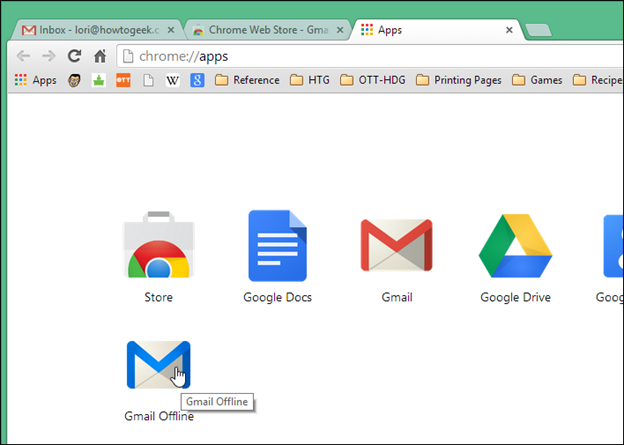
A new tab with all installed Chrome apps displays. To begin using “Gmail Offline” click the icon.
The first time you run the “Gmail Offline” app, you are prompted to allow offline mail storage. To store you email in your browser for when you’re offline, select the “Allow offline mail” option. If you choose the “Don’t allow offline mail” option, you can still use “Gmail Offline” (while online), but no mail will be stored in your browser for use when you’re offline. Never fear, though. If you change your mind, you will be prompted to make the choice again the next time you start “Gmail Offline.”
Click “Continue” to accept your choice and start “Gmail Offline.”

The “Gmail Offline” app opens in a new tab. The interface for “Gmail Offline” is different from the standard Gmail interface, but the main features, such as composing, archiving, labeling, and moving email, though it seems you cannot create labels using “Gmail Offline.”
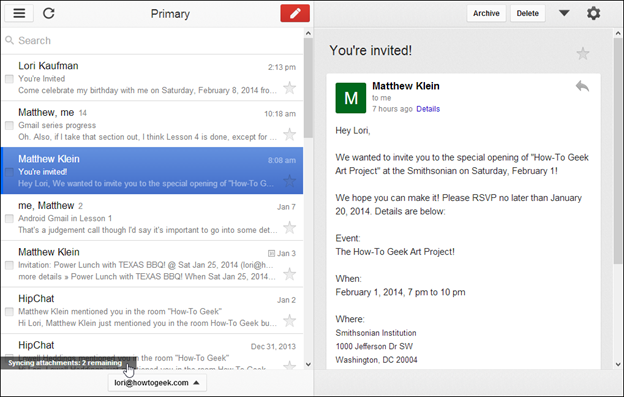
When using “Gmail Offline”, your mail is downloaded to your computer’s local storage, on which you installed the app. That makes it local to that computer. If you want to work offline on another computer, you need to install “Gmail Offline” on that computer as well. However, you can still use Gmail on the web on any computer, using Google Chrome or other browsers, without syncing.
Remove Offline Data from Your Browser’s Storage
If you decide not to sync your Gmail account for use offline, you can remove the offline data stored in your browser. To do so, open a new tab in Chrome, type “chrome://settings/cookies” into the address bar, and press “Enter,” then the “Cookies and site data” dialog box displays.
Enter “mail.google.com” in the search box. As you type, the list narrows to matching results. Once the “mail.google.com” site is found, move the mouse over the item and click the “X.”
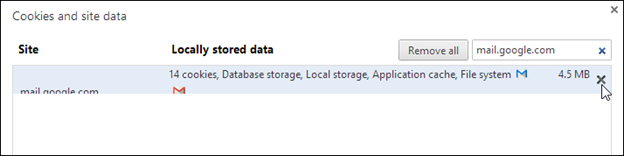
Once you have deleted the data, click “Done” in the lower-right corner of the dialog box to close it.
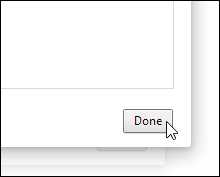
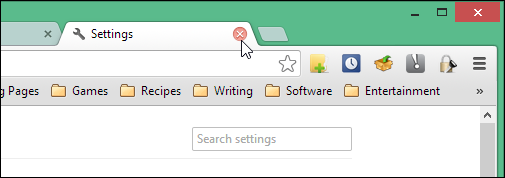
You are returned to the “Content settings” dialog box. Click “Done” at the bottom to close it. Then, close the “Settings” tab by clicking the “X” button on the tab.
Remove the Gmail Offline App from Chrome
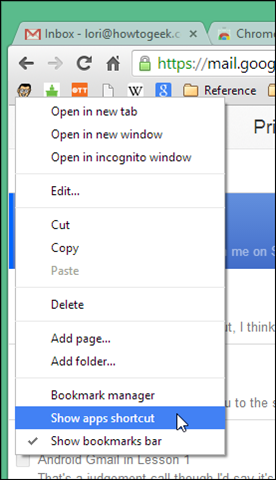
If you’ve decided that you don’t want to work offline anymore, you can remove the “Gmail Offline” app from Chrome. To do so, click the “Apps” button on your Bookmarks bar.
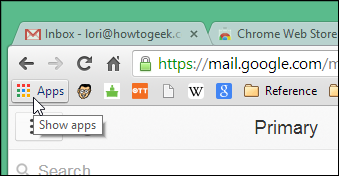
If you don’t see the “Apps” button on your Bookmarks bar, right-click on the bar and select “Show apps shortcut” from the drop-down menu.
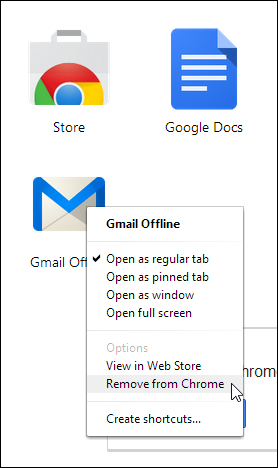
Icons for all your installed apps display on a new tab. Right-click on the “Gmail Offline” icon and select “Remove from Chrome” from the popup menu.
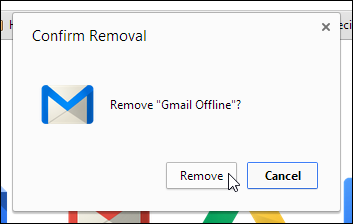
The “Confirm Removal” dialog box displays. Click “Remove” to uninstall the “Gmail Offline” app.
Close the “Apps” tab using the “X” button on the tab, just like we described earlier for the “Settings” tab.
Coming up Next …
That concludes Lesson 9. You should now feel comfortable fetching your other email account from your Gmail, configuring your settings to work more sanely with IMAP, and working with Gmail offline.
In the next lesson, we conclude this series with a host of useful power tips that you can use to increase your Gmail cred as well as exploring Google Labs a little so you can add further functionality to your Gmail experience.
Next Page: Power Tips and Gmail Labs