Showing posts with label PC Maintenance For Beginners. Show all posts

Wednesday, February 11, 2015

PC Maintenance


Here is the process for PC Maintenance

​Follow this procedure on all tools when you do maintenance/imaging
With your shift having so few tools being used, you should be able to get a couple tools done everyday.

1) Check event logs for any errors, clear logs if no issues, resolve issues found, if unable to resolve let me know, do not clear logs with unsolved issues.

2) Run Cleanmanager

3) Verify Solidcore is installed on XP, but NOT installed on anything Win 7 or Win 8, if installed you'll need to contact me

4) Delete trace.txt from C:\bts\HisTdi if exists

5) Check data size on both C and D IF under 50Gig they can be imaged, At the minimum you must get the C: partition done

6) Verify no junk on disk ex: vnc install downloads, flash downloads etc in download or temp directories, check for personal directories created on tools that operators mayh have created.

7) System restore. Check size used, if too large lower the percentage so system can be imaged, restore restore percentage back to original size after imaging.
If not turned on for C: drive, turn it on, I usually create size 130Gig/

8) Verify Remote desktop is setup for local administrator, bambi, engineer, and AD  seagate\7012; seagate\7743, engineer,  login name of tool

9) VNC is up to date and working. Check for other accounts on system. Some tools may have factory support administrator accounts, those are ok. If too many admin accounts, let me know and I will check to be sure they really should exist.

10) McAfee Agent is version 4.8.0.5600 on XP and up OS's

11) McAfee Enterprise is version 8.8.0.975

12) Engine 5600.x.x

13) administrator, bambi, engineer, ensure accounts have current passwords

14) Verify that updates are installing, most systems should have updates, verify that they are happening, if not get updates installed.
There are 1 or 2 that cannot have updates, there is usually a note on desktop from me about updates if not to be done, and they updates would be turned off. 

15) Make sure Defrag is set to run nightly and is running on schedule

16) Defrag completely before imaging​

17) Image and verify image.

Monday, February 9, 2015

Lesson 5: Protecting your Data

PC Maintenance 5
Imagine your home goes up in flames and all those memories and important moments are suddenly gone. You may mourn the loss of your house’s actual physical structure, but it’s the stuff that was inside of it that really mattered.
SCHOOL NAVIGATION
  1. Don’t Spend Money, Cleaning Your Own PC is Easy
  2. Cleaning your Computer Inside and Out
  3. Securing your System
  4. Keeping your PC Updated and Running Smoothly
  5. Protecting your Data
Similarly, if your computer gets hosed or stolen, you will definitely feel the sting of not having your computer for a certain term, i.e. until you can replace it, but what’s really going to sting and continue to haunt you for long after will be all those personal files you lost.
Of course, it doesn’t have to be this way. There are really simple ways to easily backup your data quickly and painlessly, often with little to zero interaction from you (once you set everything up). These solutions range from full system to incremental backups, using a variety of mediums.
We’re going to close out this series by detailing the things you can do to store and backup your data so that you never lose it. Out of all the things you put into your computer, no matter how expensive the components, peripherals, and accessories, you cannot put a price on your data. The time you put into your documents, photos, music collection, and everything else is invaluable and irreplaceable.
Mastering this final and very important step will ultimately make you a PC maintenance pro or, at the very least, you won’t need to ask your kids to fix your computer anymore!

Different backup mediums, pros and cons

The type of medium you back your stuff up to will depend largely upon your means, what you’re protecting, and how much you want to spend. Some storage mediums are clearly better than others so it’s important you spend a little time considering all your options.

Hard drive

Hard drives remain the cheapest and most generous backup option. Today you can easily buy a 1 terabyte external hard drive for under $100 and that is usually way more than enough to back up all your files and entire system. Of course, if you have even more data to protect, larger hard drive sizes are also very affordable.
The downside to hard drives is that they’re still doomed to fail at some point in the future. They’re also comparatively slow and consume more power than thumbdrives or SSDs.

Flash drives and SSDs

Flash drives and their hard drive brethren SSDs are the most efficient and fastest way to do backups. The ability of flash to provide very fast write and read speeds, means that you can use them to quickly archive your data.
That said, it’s hard to imagine flash technology as a good long-term storage medium. In most cases, such as with thumb drives and SD cards, the purpose is to simply carry files from one place to another, while SSDs are better intended as system or gaming drives owing to their performance rather than longevity.
And while the cost of SSDs has fallen greatly in recent years, they still pale in comparison to HDDs in terms of price and capacity.

CD-ROM and DVD-ROM

Most readers should be intimately familiar with storing files on CD/DVD. Obviously, both are limited in size, a CD has a 700 MB capacity, while a DVD is usually 4.7 GB or 8.5 GB.
We should be completely blunt about this, CDs and DVDs are a dying medium. Most of the laptops, particularly ultrabooks, produced today are eschewing optical drives, and it’s just easier and cheaper at this point to leave an optical drive out of the mix when building a new computer.
Moreover, a lot of software is only distributed online, OS X, for example, and even Microsoft is moving more and more toward the Internet to distribute Windows.
Finally, recordable CDs and DVDs simply don’t last – think years not decades – so if you are going to use optical media to archive your files, keep the following tips in mind:
  • Use high quality, “archival quality” discs
  • Use a jewel box instead of a paper sleeve to store them
  • Keep your discs clean, hold them by the edges and wipe fingerprints off with clean, soft cloth
  • Store them in a dark, dry, cool place
  • Mark your discs with a non-solvent based felt-tip marker
  • Write discs at a slow speeds to better ensure write integrity and minimize rewrites
If you really must use optical media for your backups, you should take precautions to preserve them.

Cloud storage

Cloud storage is such a new trend that a lot of people still don’t immediately consider it, but it is quickly becoming a de-facto place to back up stuff. The great thing about cloud storage is that as long as you have an Internet connection, it’s always on and present, so it’s especially good for incremental backups.
There are a few obvious drawbacks to cloud storage. For one, you have to have to be connected for it to work, otherwise you’re just saving everything locally. Also, meaningful cloud storage space (more than what is typically offered for free), is a recurring cost versus buying an external hard drive once. Finally, unless you’re connected to the Internet via a fat data pipe, like fiber, uploading is a pain, especially if you have gigabytes of stuff to back up, were talking days to upload everything.
Your best bet for backups is a combination of external hard drive(s) for archiving purposes, and cloud storage for incremental stuff.
That said, the single coolest feature of cloud storage is the fact that if you store your documents or pictures from one location, wherever you go, to whatever computer or device, if you have an Internet connection, your stuff is always there. This wonderfully eliminates the need to have copies of everything on all your devices.
Using the myriad cloud services out there is an effective way to keep your stuff constantly backed up, but if you have meaningful amounts of data then you will obviously need lots of space. That means paying for it since most of the freely allotted space is only a fraction of what you’d want.

Cloud Service Comparison

Here’s a quick comparison chart of some of the more popular cloud services out there. Keep in mind that today basically everyone has some kind of cloud storage service so there’s a lot more than appears here.
Service
Free space
Upgrade pricing
Compatibility
5 GB
Pricing starts at $10/year for 20 GB and tops out at
1000 GB for $500/year
Kindle Fire, Android, iOS,
Windows, Mac
5 GB
10 GB – $20/year, 20 GB – $40/year,
50 GB – $100/year
iOS, Mac, Windows
10 GB
Pricing starts at $5 per user per month for up to
100 GB and can top out at $35 per user
per month for unlimited storage.
Android, iOS, Windows
None
Carbonite markets itself as a complete backup
solution. Pricing starts at $59.99 per year
per computer for unlimited storage.
Windows and Mac
2 GB
Dropbox offers incentives to gain more free space.
Upgrade pricing starts at 100 GB – $8.25/month,
200 GB – $16.60/month, 500 GB – $41.60/month. All plans are billed annually.
Windows, Mac, Linux, Android,
iOS, Blackberry, Kindle Fire
15 GB
Drive’s space is shared with Gmail and Google +.
Upgrade pricing starts at 100 GB – $1.99/month and
1 TB – $9.99/month
Windows, Mac, Android, iOS
7 GB
Pricing starts at 50 GB – $25/year,
100 GB – $50/year, 200 GB – $100/year
Windows, Windows Phone, Mac,
iOS, Android
2 GB
You can get more free space by referring friends.
Upgrade pricing starts at 50 GB – $5.99/month
and 125 GB – $9.99/month. You can add an
additional 20 GB for $2/month and
additional computers for $2 per month per computer.
Windows, Mac, iOS, Android
Plans are free to try for 30 days.
Pricing begins at 60 GB – $7.49/month or
$74.99/year, 100 GB – $9.99/month or $99.99/year,
250 GB – $24.99/month or $249.99/year,
1000 GB – $55/month or $550/year.Alternatively,
Sugarsync will let you develop a custom tailored plan.
Windows, Mac, iOS, Android

Using your back up to target specific data stores

In Windows, there’s a couple of data stores that you can safely focus on backing up, which will better ensure all your essential personal data is safe, namely “Libraries” and “Special Folders.” Libraries are basically collections of stores and you can add to them to consolidate your various data types: Documents, Music, Video, Pictures, and Downloads.
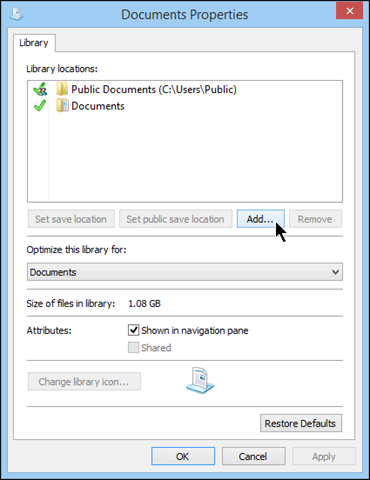
clip_image001
So, one way to quickly backup your music files, for instance, would be to add your music folders and/or drives to the “Music” library. Then all your music is one place. Rather than having to add your music location(s) in your backups, you can simply add the library such as with our “Documents” library in the screenshot.
clip_image002
Here then, if you have several folders that fall under the documents category, they’re all in one designated repository.
On the other hand, while you may have all your documents consolidated in the “Documents” library, you may only want to back up the designated system folder.

Lesson 5: Protecting your Data

Special folders

Many Windows users are familiar with their documents folder, and they know that their photos are automatically saved in the “Pictures” folder in the user folder, while videos default to the “Videos” folder, etc.
One of the cool things you can do with special folders is move them to your cloud service. This helps you create seamless roaming folders such that, when you redirect your “Documents” or “Music” folders to a cloud drive, you can quickly sync your data on every Microsoft profile you log into, simply navigate to your user folder, and move your special folders.
Let’s briefly demonstrate how you’d do this with Dropbox, Google Drive, and Microsoft OneDrive (formerly SkyDrive).

Moving Special Folders

So the idea here is that we’re going to take one of our special folders, in this case the “Desktop” and move it to a cloud folder, which means that it will be synchronized to the cloud every time we make a change to it. This not only backs up the special folder continuously, but you can also move your special folders to a cloud folder for seamless synchronization across all your connected Windows devices.
The following instructions are for Dropbox, however, the same instructions apply to the other cloud services too. In fact, all these cloud services install special folders in your user folder so you can also relocate them to a larger hard drive, if necessary.
To move a special folder you can either navigate to your user folder, for example, C:UsersMatt, or you can simply right-click and select properties for many of the system’s special folders in “File Explorer.”
clip_image004
In the “Properties” dialog, click “Move” to relocate the folder to another location.
clip_image005
In the “Select Destination” window, navigate to the location where you want to move the folder and then choose “Select Folder.”
clip_image007
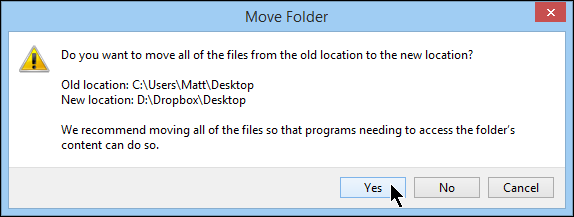
A warning dialog will appear asking you if you’re positively sure you want to move all the files from the old location to the new one. Click “Yes” to continue.
clip_image008
Data in the older folder will then be transferred to the new location. Note, if you want to move that particular special folder again, you will need to choose it from its new location or “File Explorer,” if applicable.

Backup Tools

There are two ways to back stuff up, archival and incremental. In Windows, this can be accomplished either through “System Image” backups or “File History,” respectively.

File History

“File History” was introduced in Windows 8 so it is not available for other Windows versions. The concept of “File History” should be very familiar to anyone who has paid attention to Apple’s “Time Machine” for OS X. “File History” like “Time Machine” works by creating incremental backups.
This means that at regular intervals, be they ten minutes, an hour, a week, etc., your libraries, desktop, contacts, and favorites are backed up to another drive or partition. The difference, however, between simply backing things traditionally where you typically overwrite the old backup with the new one and in the case of “File History,” is that backups are saved as versions.
This means that “File History” will save every version of a file or folder structure, and any changes that take place, at the preset interval. So, if you suddenly realize that you need made changes to a source file instead of making a new copy, you can go back and retrieve that file as if it never happened.

Selecting a drive and turning file history on

“File History” is super easy to start and configure, either from the Control Panel or “PC settings.” Before you actually turn “File History” on, it is a good idea to make sure you have chosen your backup drive.
To choose a backup drive, click “Select Drive” and choose a backup drive from the “Select a File History drive” screen.
clip_image010
Once you’ve selected a backup drive you can turn on “File History” and it will automatically start backing up your libraries, desktop, contacts, and favorites and will continue to do so until the backup drive’s allocated space is used up, or the drive runs out of space, thereafter the oldest backups will be automatically deleted to make way for the new backups.

Excluding Folders

If you want to back up everything “File History” does by default, then you can safely leave it to its own devices. However, if you want to keep your backups small, or the sum total of your libraries exceed your available disk space, you can exclude folders.
Simply click “Exclude Folders” and on the “Exclude from File History” screen and click “Add” and choose the items you want to exclude.
clip_image011
Note, “File History” only backs up your Libraries (Music, Pictures, Videos, Documents, Downloads), Contacts, Desktop, and Favorites. If you want to include other files and folders in “File History,” you will first need to add them to your Libraries (detailed earlier).

Restore personal files

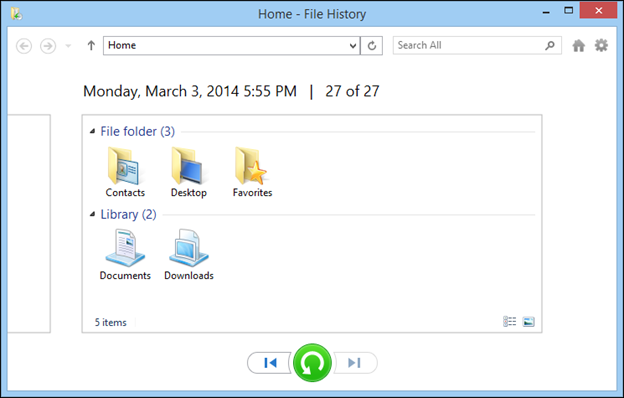
Should the time come when you need to retrieve a previous file or folder version, click “Restore personal files” and the file restore screen will appear. You can “rewind” and “forward” through your backups and then click the green restore button when you find the item(s) you want to restore.
clip_image013

Advanced settings

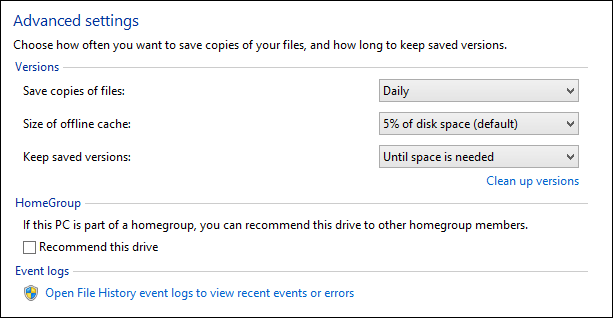
Finally, the “Advanced Settings” allow you to choose the frequency “File History” creates backups, and how long it keeps saved versions. You can also set the size of your offline cache, and decide how it keeps saved versions.
clip_image014

Lesson 5: Protecting your Data

System Images

When you create a system image, you are taking everything that is on a drive or partition and copying it to a backup medium. Because of the way images work, when you restore one, your computer will restart and the backed up system will overwrite your current installation. When your computer reboots, your computer will be restored to the same state you imaged it to.
Therefore, before making any backup images, make sure you’ve fully updated your system and you’ve installed any main apps you normally use. This ensures your recovery time is minimized if you do ever have to reinstall the system image.

Creating a System Image

To open the “System Image” wizard in Windows 8.x, you can click the link from the “File History” screen.
clip_image015
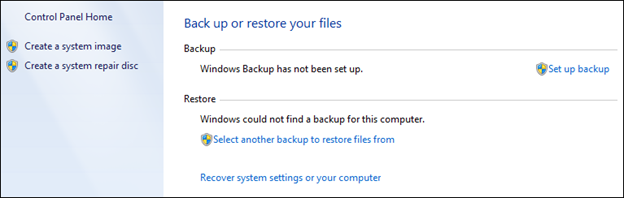
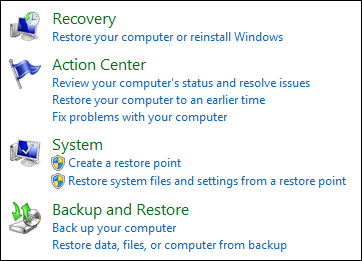
In Windows 7, you can open “Backup and Restore” from the Control Panel.
clip_image016
If you want to “Create a System Image”, click the appropriate link.
clip_image018
Note, the Windows 7 “Backup” section, and specifically the “Set up backup” link. Clicking this link will trigger the old style “Windows Backup,” which no longer comes installed on Windows 8.x. You can use “Windows Backup” to back up your whole drive or just certain parts.
Since Windows 7 doesn’t come with “File History,” you can use “Windows Backup” for incremental backups, though it won’t be as simple or convenient.
clip_image019
Creating a system image on either Windows 7 or Windows 8.x is virtually the same so we’ll continue this discussion showing the Windows 8.x version. When the wizard first opens, you can choose to save it to a hard disk, one or more DVDs, or a network location.
After selecting your backup destination, click “Next” to move the proceeding screen.
clip_image020
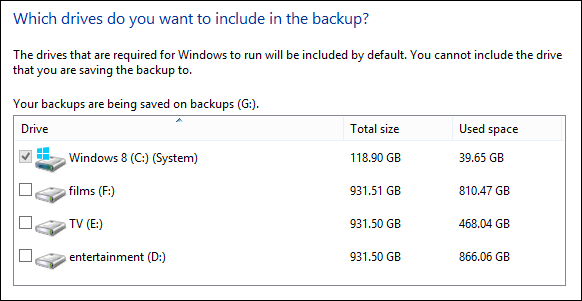
Here, you will need to choose the source drive or partition. Note you can choose one or more sources to back up.
clip_image021
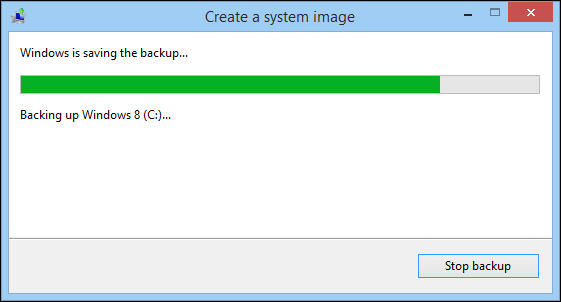
The next screen will ask you to “confirm your backup settings.” It will tell you approximately how much disk space it will take up, and that any existing system images could be overwritten. Click “Start backup” and your backup will begin.
clip_image022

Restoring a System Image

Restoring a system image is easy. In Windows 7, simply open the Control Panel and type “Recovery” in the search box. Then choose “Recovery.”
clip_image023
Then, choose “Advanced recovery methods” below the “System Restore” option.
clip_image025
Finally, choose “Use a system image you created earlier to recover your computer” to begin the recovery process.
clip_image027
In Windows 8.x, use the Metro “PC settings” and choose “Update and recovery” and then “Recovery” and then click “Restart now” under “Advanced startup”. When the computer restarts, you will be shown a blue “Choose an option” screen.
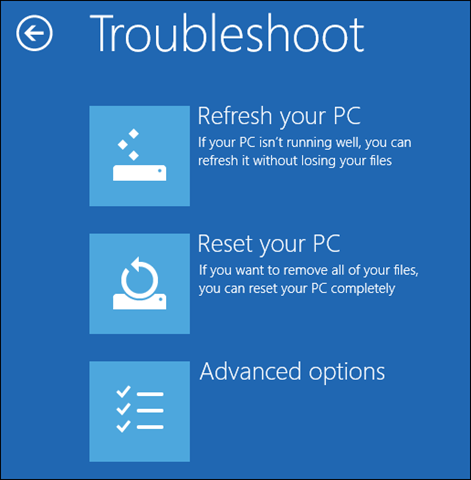
Click “Troubleshoot” to continue.
clip_image028
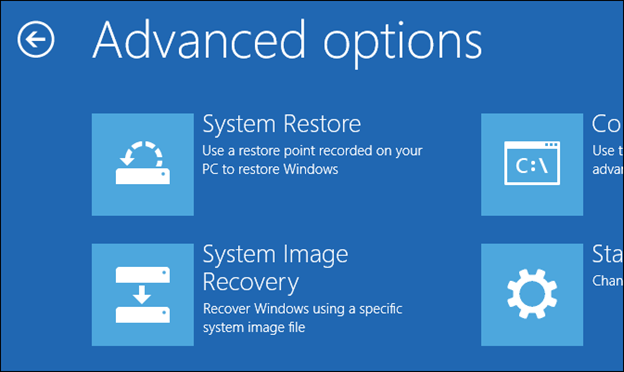
On the “Troubleshoot” screen, choose “Advanced options.”
clip_image029
Finally, on the “Advanced options” screen, choose “System image recovery” to begin the process.
clip_image031
And that’s it, your computer will be restored and everything will be back in place as you left it!

Conclusion

And so concludes this How-To Geek School series. We hope you enjoyed it and now feel confident and comfortable maintaining your system. If you missed any earlier part, be sure to check out our previous four lessons accessible from the table of contents at the top of the lesson!

Lesson 4: Keeping your PC Updated and Running Smoothly

PC Maintenance 4
Today we’re going to talk about improving your PC’s performance beyond the basic steps we’ve already covered thus far. Chances are your computer runs perfectly well until you start stressing it, and then it will obviously slow down as it is given more demands.
SCHOOL NAVIGATION
  1. Don’t Spend Money, Cleaning Your Own PC is Easy
  2. Cleaning your Computer Inside and Out
  3. Securing your System
  4. Keeping your PC Updated and Running Smoothly
  5. Protecting your Data
Yet, there’s still those times when your system just bogs down and doesn’t seem like it wants to budge – like it’s stuck in mud and switching between apps seems to take an age. If your system feels slower, then it most likely is.
Many performance problems can simply be tracked down to too much overhead and too few resources. In other words, your computer can only handle so many simultaneously running processes before it starts to show signs of strain. This may manifest as long load or boot times, or applications may hang or stall, or the computer may exhibit signs of instability such as blue screens or sudden restarts.
This is the practical advice lesson and it will be here that we talk about improving your diagnostic skills with the all-powerful “Task Manage,r” which is far more useful than its simple name would imply.
Before we do that, however, we’re going to delve into something very important which is very often neglected by a vast number of PC users: updates.

Keeping Things Properly Updated

If your system isn’t regularly updated, it could be compromised and open to attack from hackers. Microsoft regularly issues patches and security updates and if your system isn’t set to download and automatically install them, or you’re not super diligent about checking for, downloading, and installing these updates, then you put your system at risk.
Perhaps even more important, however, are those other little programs that don’t always get star treatment: Oracle Java, Adobe Flash, and Adobe Reader. While we did cover these plugins in the previous chapter, we want to stress again how important it is that these types of programs, any program really, are kept up-to-date.

Windows update

Windows provides a utility, aptly named, “Windows Update,” that allows you to keep your system patched and secure (to an extent) from any malicious attempts to gain access and seize control of your computer.
When you first create a master or administrator account on a new Windows install, you will be asked whether you want updates to download and install automatically, or if you want to do this manually. We highly recommend you allow Windows to take care of updating itself.
Nevertheless, if you think you want to handle this portion of PC maintenance, then you need to know how to use “Windows Update” so you never miss a critical update.
To open “Windows Update” you will need to open the Control Panel. This is true whether you’re on Windows 8.x or Windows 7. In Windows 8.x, you can also update your system via the “PC settings” in the Metro interface under “update and recovery.”
clip_image002
For the sake of consistency, let’s stick to the desktop version. Once you’re familiar with that, the Metro version is pretty much the same thing.
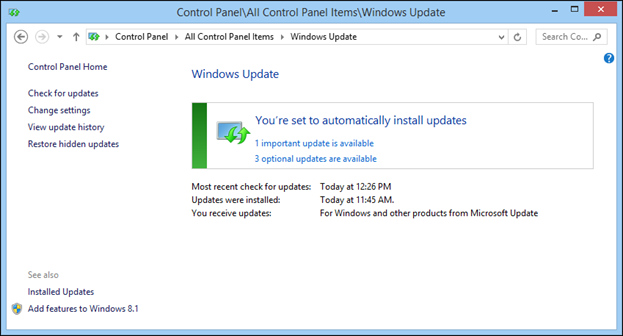
When you first open “Windows Update” you will see its status, such as whether “you’re set to automatically install updates.” In the following screenshot, we see we have 3 three optional updates available, but we also initiated a manual “check for updates” and we see we have one important update too.
clip_image004
You can click on the links to see what these updates are. You should install whatever important updates are available, but you can be a bit pickier about optional updates.
clip_image006
In fact, you can even right-click on an update and hide it, so it no longer shows up in “Windows Update.”
clip_image008
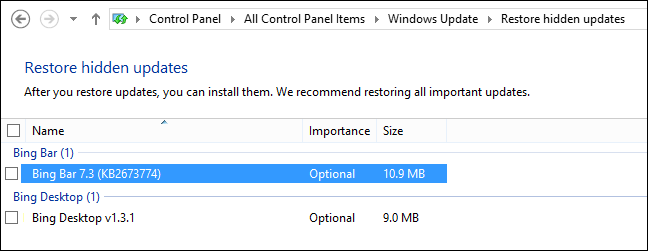
Worry not, if you find you really need the “Bing Bar” or “Bing Desktop” or some other hidden update, you can use the “restore hidden updates” function.
clip_image009
All-in-all, “Windows Update” is a cinch to use, so if you decide to attend to your own updates, it’s usually a matter of remembering to install them. Luckily, you can set the level at which important updates occur with “Change settings.”
“Windows Update” not only handles important updates, but recommended updates, and updates for other Microsoft products like Office. You can disable these later two if you don’t want to receive them through “Windows Update”.
clip_image010
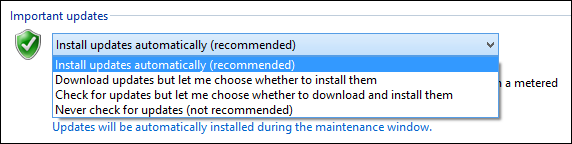
With regard to “Important updates,” you choose between one of four different configurations giving you the full array of control over your updating process. You honestly don’t want to turn off automatic updating completely, but you can choose whether it notifies you that updates exist and then give you the choice whether to download and install them, or download them and then install them.
clip_image011
Note at the bottom of the important updates section there’s a link “updates will be automatically installed during the maintenance window.” Click on this and you will be able to decide when Windows Update runs. By default, it’s set to run daily at 3 AM and will wake up your computer, if necessary.
If you don’t want “Automatic Maintenance” waking up your computer at 3 a.m., either uncheck the box next to “Allow scheduled maintenance to wake up my computer …” or change the time to when you know the computer will be on.
clip_image012

Java, Flash, and Reader

While Java, Flash, and Reader only represent a small drop in the bucket when it comes to applications, they’re often the most common entry points for many types of malware, especially Java, which is said to be responsible for HALF of all security exploits.
Don’t stop reading here, because we’re about to cover how to make sure you are protected!
Lesson 4: Keeping your PC Updated and Running Smoothly

Oracle Java

Oracle’s Java gets no love from us. By and large it just seems like an accident waiting to happen, but as we said previously, you may be able to do 99 out of 100 things on your computer, but there’s always that one that requires Java.
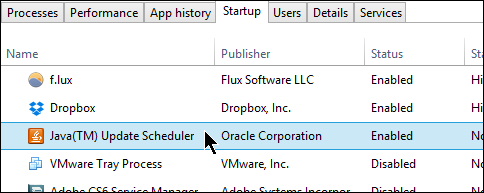
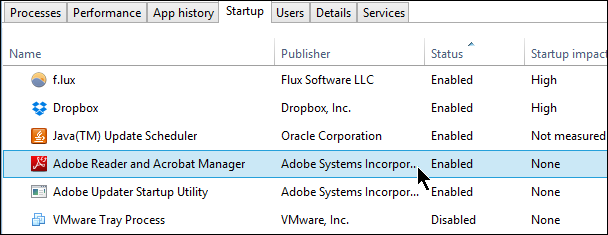
Java comes with an “Update Scheduler” that automatically runs at regular intervals thus checking for, downloading, and installing updates. You can see it here in our “Startup” tab on the “Task Manager.”
clip_image013
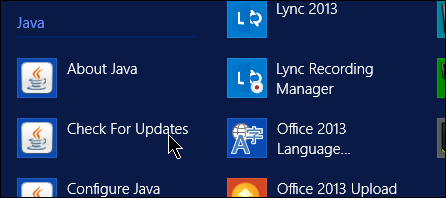
Updating Java manually is a cinch. Simply open your “Start” menu (it will be in “All Program” in Windows 7) and click “check for updates” in the Java menu.
clip_image014
Alternatively, you can simply open the “Java (32-bit)” control panel from the Control Panel.
clip_image015
Once open, select the “Update” tab to see your available update options. In the following example, the updater is set to notify the user before downloading any updates. This can be changed to automatically download updates, and to then notify us before installing.
clip_image016
If you want to turn off automatic updates (highly not recommend), then uncheck the box next to “Check for Updates Automatically.”
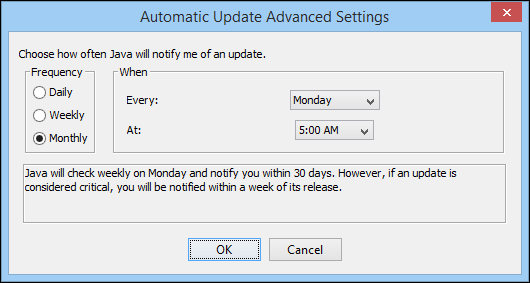
What is recommend is clicking the “Advanced” button and altering your update schedule. In the following screenshot, we see that Java is set to check for updates every month on Monday at 5 a.m. It seems unlikely, no matter how bad a Monday it is, that we’ll be up at 5 a.m. so we can change this to something else, possibly more frequently, at a more productive time of day.
clip_image017
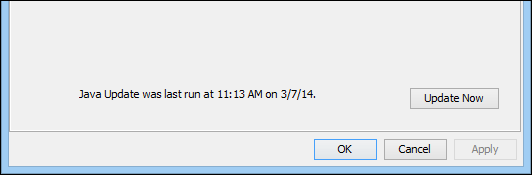
Finally, to execute a manual update, click the “Update Now” button at the bottom of the Java Control Panel.
clip_image018
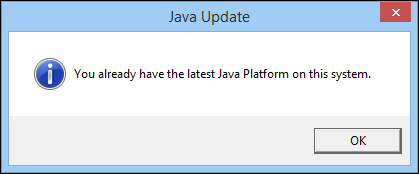
If there are updates available, it will prompt you to update. If there aren’t, then you’re good to go (for now).
clip_image019

Adobe Flash

Adobe Flash Player is arguably the most widely used browser plugin out there. So much so that it is largely indispensable, which makes it a very attractive target for exploits. We described how to manage extensions and plugins in the previous lesson so we’re not going to dwell further on that.
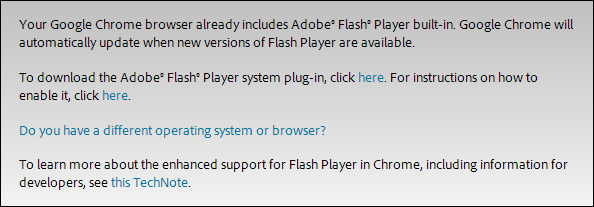
For the most part, browsers, particularly Google Chrome (which we recommend) are pretty good about automatically updating plugins.
clip_image020
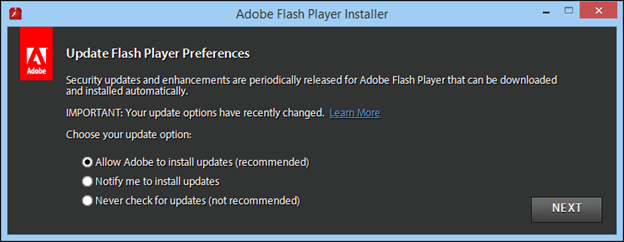
That said, if want to download the “Adobe Flash Player system plug-in” (for use with other programs such as video processing) then you will be presented with the following options.
clip_image022
There’s really not a lot to think about here, you should most definitely “Allow Adobe to install updates.” Once installed, you can administer to the system Flash Player from the Control Panel.
clip_image023
The Flash Player control panel is similar to the Java control panel only the update settings are on the “Advanced” tab. Click the “Change Update Settings” button and you will be able choose one of the other two options. Note, you must have administrator rights to do this.
clip_image024
To execute a manual update check, click the “Check Now” button. You will be whisked to Adobe’s Flash Player page and if an update is needed, you can download and install it from there.

Adobe Reader

Finally, last, but obviously not least, is Adobe Reader. Reader, like Flash, is another (almost) indispensable utility. There are Reader alternatives out there and you’re certainly free to explore your options, but for many a user, Adobe’s offering is one of the first things (apart from another browser) that they install.
By default, Adobe places the “Adobe Reader and Acrobat Manager” into your system’s startup routine. This will automatically check for program updates whenever Windows starts. You can disable this of course, but then you will need to check for program updates manually.
clip_image025
To check for program updates manually, open the Reader application and from the “Help” menu select “Check for Updates… .”
clip_image026
If any updates are found, you will be able to install them, otherwise you’re good to go.
clip_image027
As we mentioned, there are Reader alternatives out there. At one time Foxit Reader was one of our favorites, but it’s since become bloated with crap. If you don’t want to use Adobe Reader, then you might want to try Sumatra PDF, which is free, lightweight, and not Adobe.

Drivers

Drivers are the little bits of intermediary software that allow your hardware to work with Windows. Without drivers you wouldn’t be able to connect to the Internet or send things to your printer. When Windows 95 first debuted, drivers were something of a mess and in order to fully keep on top or your system, you’d have to manually install drivers from each manufacturer, and for any new hardware you added.
This situation didn’t actually start to improve until Windows XP, and didn’t become a no-brainer until Windows 7. Today, there’s almost nothing you need to do with Windows 8.x. In fact, we’d be surprised if you ever have to install a driver yourself again.
Furthermore, if drivers do need updating, they’ll appear in “Windows Update” under “Optional” updates.
That said, if you have a computer you want to play games on, we recommend installing the graphic card manufacturer’s recommended drivers. You’re almost certainly going to have a graphics chipset supplied by Intel, Nvidia, or AMD. The latter two release drivers for their chipsets on a regular basis so you can visit their downloads pages for more details:
If you’re not sure whether you want to do this or you simply don’t care about gaming, then chances are you should just use the driver that “Windows Update” installs and you will be fine.

Lesson 4: Keeping your PC Updated and Running Smoothly

Getting to Know the Task Manager

The “Task Manager” should be your first stop when nailing down performance hiccups. To access the Task Manager, you can hit CTRL+ALT+DEL and choose “Task Manager” or right-click on the taskbar and choose it from the menu.
clip_image028
The “Task Manager” in Windows 7 is probably familiar to a lot of you. It’s relatively unchanged between Windows versions.
clip_image029
The “Task Manager” in Windows 8.x has received quite a makeover but retains its essential functionality. For the purposes of this section, we’re going to concentrate on this “Task Manager” version. You should be able to achieve the same goals using the Windows 7 version, it will just look different.
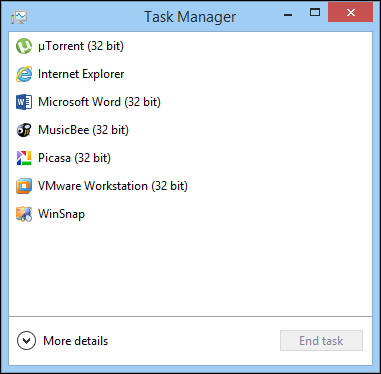
The new-look “Task Manager” defaults to a very simple streamlined interface. There’s not a whole lot we can do with it other than end non-responsive applications however, if you click “more details” then the sheer power of the “Task Manager” is revealed.
clip_image030
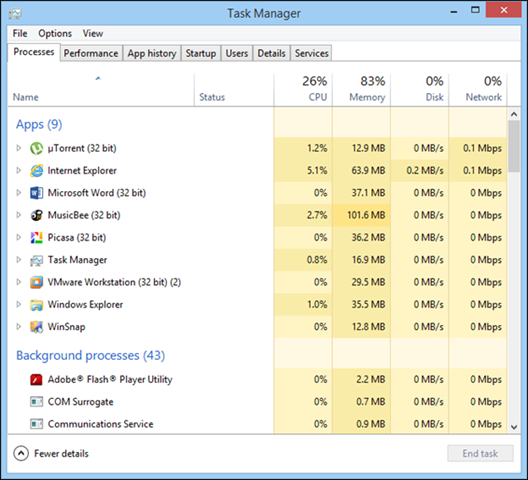
The “Processes” tab lists every running process on your system. This is very useful for diagnosing hung apps and excess system overhead.
clip_image032
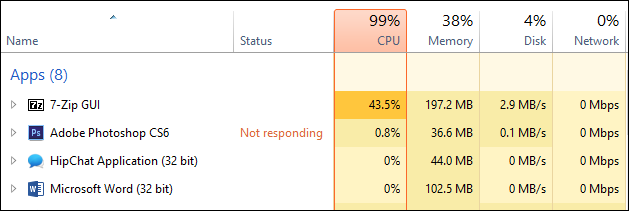
If an application “hangs” it means it stops responding, this can be a temporary situation while the computer works to free up resources, or it can mean that the application needs to be ended. In the following example we’ve purposely stressed our system with a bunch of resource-intensive tasks to show you what this looks like. Note, the application with “not responding” in red next to it.
clip_image033
If this happens to you and it feels like your system is dragging, you may need to free up resources by quitting stuck applications. You can try closing a problem application by trying to properly exit, but if an application is really misbehaving, then from the “Task Manager” click on the problem app and then the “end task” button in the bottom-right corner.
Note, if you end an application abruptly, you will possibly (probably) lose any unsaved work so use this power with great care. When at all possible, try closing other unused, running applications to try to free up system resources and/or wait for the hung application to respond.

Pinning Down Performance Bottlenecks

Applications don’t always need to become non-responsive for your system to slow to a crawl. At times like this, it’s great to use the “Task Manager” to check where you might have performance bottlenecks. Looking at the “Performance” tab, we see a freshly restarted system under minimal load. Across all our metrics, we see that our system is having no performance problems.
clip_image035
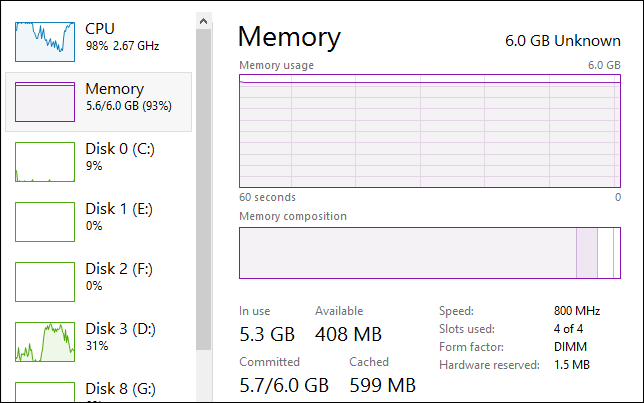
Check out what happens, however, when we place our system under extreme load. In this example, we’ve fired up a virtual machine, which causes RAM and CPU usage to spike and destabilize our system.
clip_image036
See here we are utilizing 100% of our CPU.
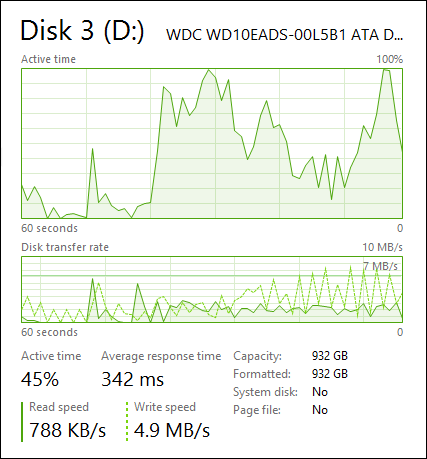
clip_image037
And there’s also a sharp spike in disk I/O, which can cause our system to stutter and lurch along as well.
clip_image038
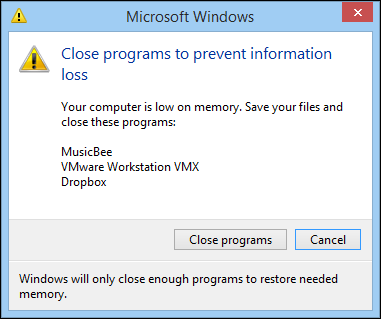
Sometimes if you stress your system to the max, a warning box will pop up telling you that your memory is low, and you need to close programs to free up resources.
clip_image039
The dialog box has a button “close programs,” and it will list various applications that it will end. Note, you may actually be using some or all these programs so simply clicking that button may have undesirable results.
Obviously, there’s a more refined way to diagnose system slowdowns. In our “Task Manager” we can order applications and services by clicking on the appropriate header (“CPU” in the screenshot). Here the “VMware Workstation VMX” process has our processor tied up pretty well and overall it is pegged at 99 percent. There’s basically no room for any other process.
clip_image040
Note here in the next screenshot, we’ve ordered everything according to “memory” to give you an idea of which things can help you free up RAM in a pinch. In this case, we can close Google Chrome, Dropbox, and MusicBee and recover quite a bit of memory.
clip_image041
The “Task Manager” is invaluable to any Windows user but it’s important to remember that it is only a diagnostic tool so knowing how to apply the information it conveys and make intelligent maintenance decisions can alleviate a lot of common system slowdown woes.

Coming up Next …

Tomorrow, in our final lesson, we’re going to talk about a critical, yet consistently unheralded, aspect of PC maintenance: protecting your data. We’re going to talk about the various backup mediums you can use as well as the tools that come with Windows. You definitely don’t want to miss this lesson as it can be a world of difference between a major data catastrophe and minor inconvenience.
Next Page: Protecting your Data